

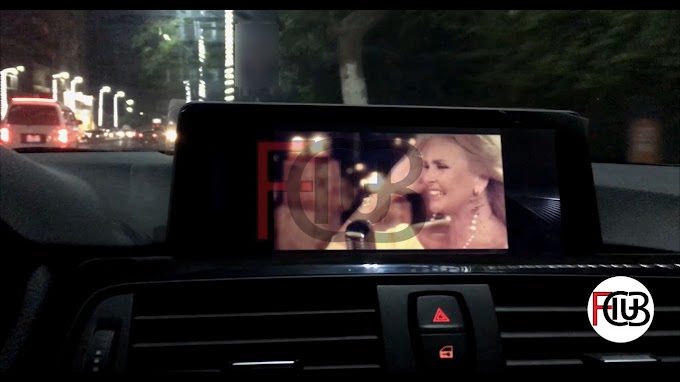
In this article we will show you how to code video in motion (VIM) for BMW vehicles, F-series (Fxx) that comes or retrofitted with NBT navigation system or ID4. We will see the detailed procedure for coding VIM for your BMW by using E-SYS and for unlimited speed.
The coding of VIM for NBT head units differs from coding for NBTevo (NBT2) head units. Video in motion coding for NBT has no complications and the coding activates VIM for unlimited speed. But for NBT 2 there are some complications due to new firmware used for it. So if we used the same functions for coding as NBT, the result will activates VIM for a restricted speed which is up 63 KM/H only. But fortunately there is another coding solution that could give you the video in motion activated on NBT 2 head unites with no speed restrictions. Learn how to code video in motion for NBT 2 (NBTevo) head units for unlimited speed by clicking here.
So, we are here now concerning of coding BMW, F-series vehicles (Fxx) with NBT navigation systems to enable video in motion for unlimited speed by coding with E-Sys.
The detailed steps for coding VIM by E-SYS:👇👇
- Connect your car to E-Sys via iCom or e-net cable. Learn How to connect your car to e-sys using e-net cable.
-
Read your vehicle's "FA" and "SVT" after establishing the connection to
your car. Learn How to read "FA" and "SVT"
* Don't forget to save your original FA and SVT before starting coding process.
-
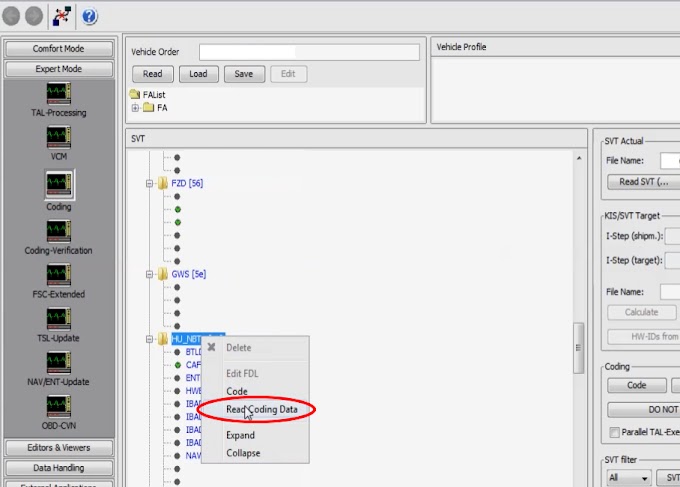
At SVT section, find and select "HU_NBT" module, right click then "Read
coding data".
-
When reading coding data is completed, the CAFD file (.ncd) is
generated and the report window will be popped-up. Review any errors if
found, and if there is no error close the window.
-
Expand the generated CAFD folder and select the CAFD file, right click
then "Edit FDL"
- The FDL-Editor window is now opened. You can use the search to find the functions, or go directly to the following:
- Section # 3000
- Browse to find the function "SPEEDLOCK_X_KMH_MIN", expand the function folder and the sub-folder. The default value is " 03 " in hexadecimal which means 3 KMH.
- Select the file "Werte=03" then right click the mouse and click "Edit".
- At the bottom section which called "Values from ECU", delete the value "03" and replace it with the new value " FF " .
-
Click at the Apply button to apply changes. You will notice that the
"Werte" value was updated from
03 to
FF
- Repeat the same steps and browse for the next function as the following:
- Section # 3000
- Find the function "SPEEDLOCK_X_KMH_MAX", expand the function folder and the sub-folder. The default value is " 03 " or " 05 " which is 3 KMH or 5 KMH.
- Select the file "Werte=03" , right click then click on "Edit".
- At the bottom section, delete the value " 03 " or " 05 " as you found in your vehicle and replace it with the new value " FF " .
-
Click the Apply button to apply changes. You will notice that the
"Werte" value was updated from 03 or 05 (as the
default of your car) to FF.
- For more ensure, check the following functions:
- Section # 3000
- Find "SPEEDLOCK_SPEEDVALUE_MIN", in the same way expand the function folder and the sub-folder. If the default value is " nicht_aktiv ", then leave it as it is.
- If you found the default value is " 03 " , right click and click "Edit", then choose "nicht_aktiv"
-
Do the same for the function "SPEEDLOCK_SPEEDVALUE_MAX".
- Also check the following functions in section # 3000:
- VIDEO_HANDBRAKE and update the current value if needed to "nicht_aktiv"
- VIDEO_FRONT_LOCKED and update the current value if needed to "nicht_aktiv"
-
VIDEO_SPEEDLOCK_CONDITION and update the current value if needed to "none"
-
Now click "Save" to save changes to FDL, then click the back arrow to
back to the main window or coding view.
-
At "Vehicle Order" section, right click "FA" then "Activate FA".
* Note: this step could be done after reading FA directly, but it's preferred to do it here after finish editing or changing the FDL.

-
Select the updated FDL file, right click then "Code FDL" or simply
click on "Code FDL" button on the right hand side.
-
At the end of coding process, close the coding window and be sure that
coding result is in green and done without errors, then close the
window. You may save the coding result if you like for
information.
-
Click on "Connection" button to disconnect your car, then click "Close"
on confirmation message.
- Wait your iDrive screen to finish restarting.
-
Now the video in motion is activated for your vehicle.


0 Comments